Wednesday, April 1, 2015


     This is a later view of the HRD III that I modded. The two 100uf filter caps are probably overkill, since only one is already more than twice the original Fender value. You can see I used JJ caps. I'm not sure if I got them from AES, (Antique Electronic Supply: tubesandmore.com), or from Weber Speakers: tedweber.com. I replaced the standard 22uf caps with 47uf or 40uf, F&F caps,. Again, I don't remember for sure which of the above two vendors I got them from.

Wednesday, July 17, 2013

FHR Deluxe Circuit Mods

Fender Hot Rod Deluxe Mods            Rev 7/17/13
(Done on Nick Mondy’s Amps)

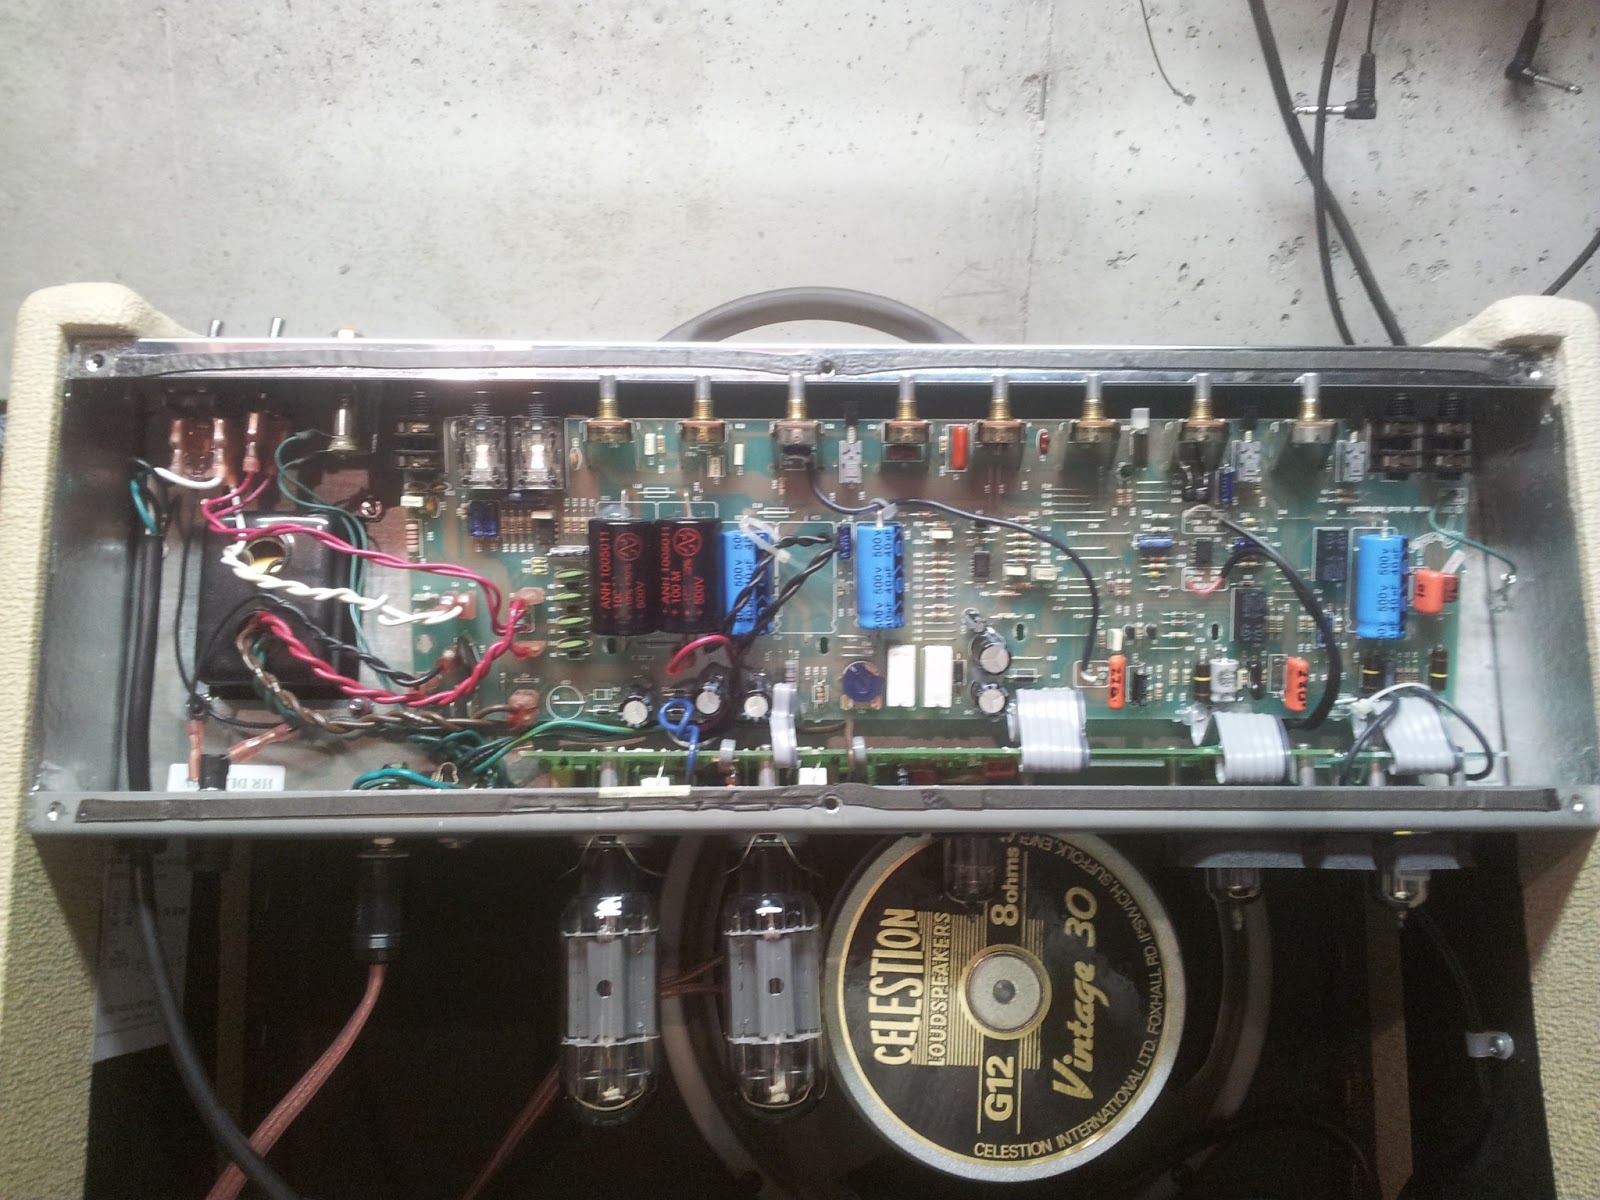
1)    Upgrade Speaker if desired. My personal preference is the Celestion V30. (This requires removing the amp chassis from the cabinet).
2)    New JJ 6L6 Power Tubes  (bias at 67mA).
3)    Upgrade speaker cable. (Use 16, 14, or 12 gauge cable).
4)    Hot Glue flex cables to circuit board before bending circuit board out to access solder side of PC board
5)    Reflow all solder joints on both circuit boards.
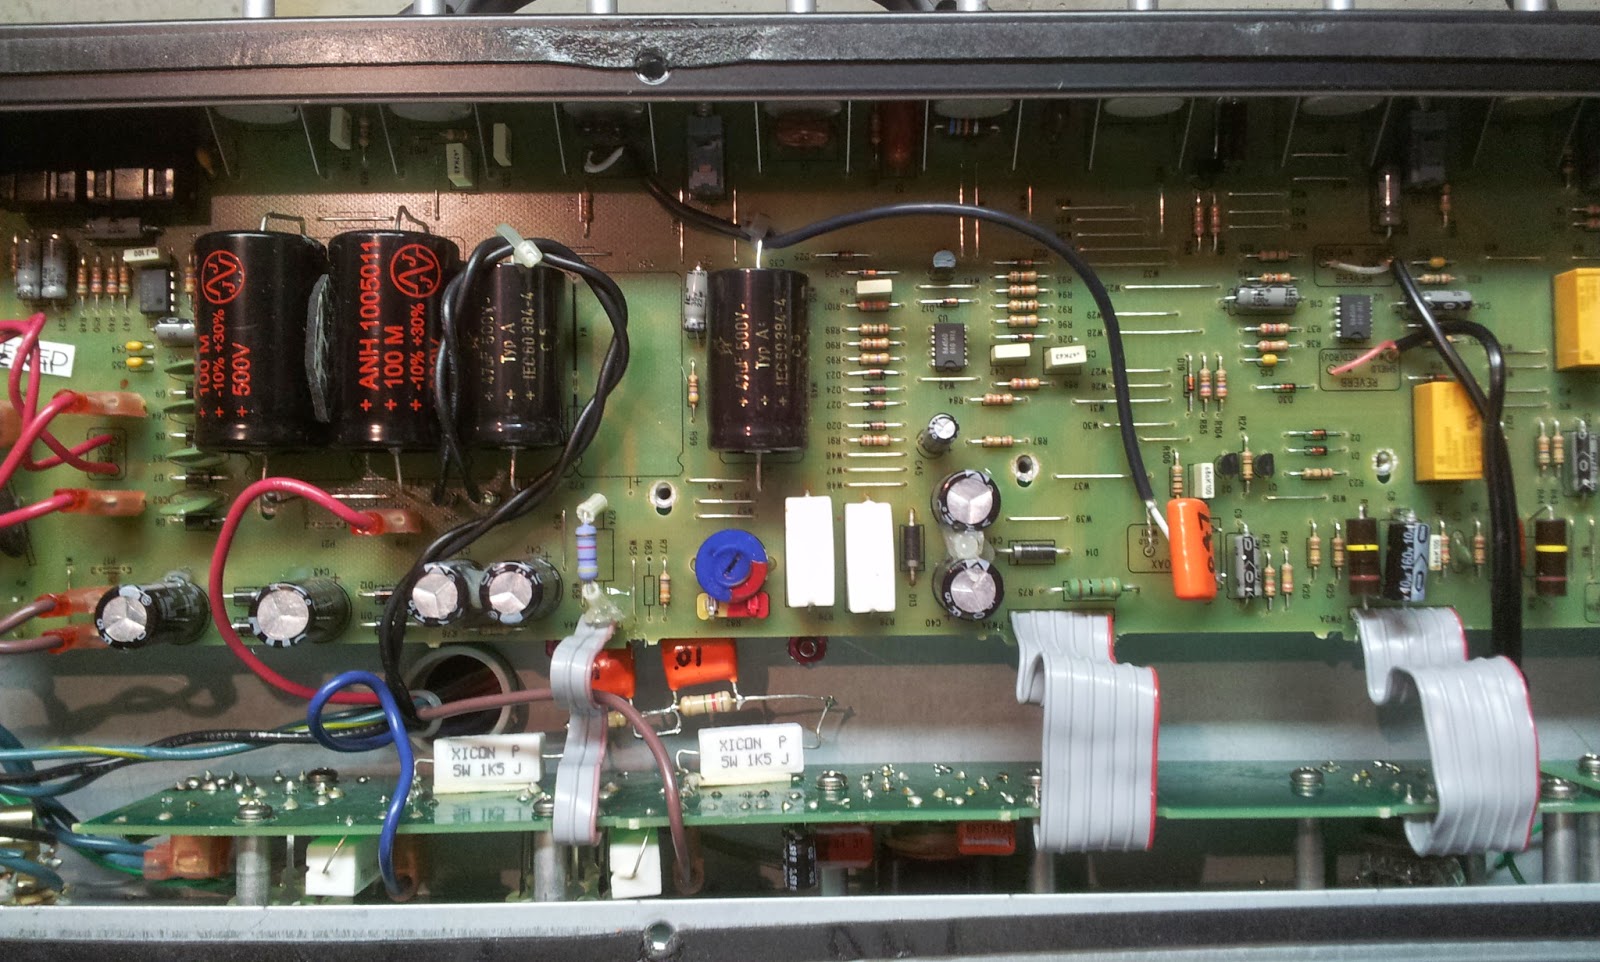
6)    Replace 47uf cap, C31 power supply filter cap with a 100uf, 500V. (You can also add a 2nd 100uf Cap in C32. Be sure to insert a jumper across R70).
7)    Replace all C5 & C6 Tone caps with Sprague “Orange Drop” type, same values. C7 use Silver Mica cap:
     a) C5 – Bass: .1uf, 400V
     b) C6 – Mids: .022uf, 400V
     c) C7 – Treb: 250pf, 400V
8)    Replace all four - 100K plate resistors with Carbon Compound, 1W. (R4, R11, R16, R22).
9)    Replace 130K Tone slope resistor (R12) to 68K. (Makes tone controls more dynamic).
10) Replace 390pf C11 with a 50pf. (Allows more high’s thru the Drive/More Drive Channels).
11)  Replace cap C23 (1.5nf) with.0022uf Orange Drop cap.  (Improves Bass response in Drive/More Drive channels).
12) Replace C18 (.022uf) with .022uf – 400v Orange Drop cap. (Adds highs to More Drive Channel).
13) Replace C2 (.047uf) with .022uf -400v Orange Drop cap. (Adds just a little more highs to both Drive Channels).
14) Replace C3 (250pf) with 82pf -1Kv. (Adds highs to Drive Channel).
15) Replace cap C8 (1uf) with 22uf. (Overall tone of More Drive channel is less harsh).
16) Replace C9 (22uf) with 1uf - 100v. (Decreases slightly the amount of volume difference when switching between the Drive/More Drive Channels. Lessens the ”bite” of the More Drive channel).
17) Replace C10 (.047uf) with .022uf -400v Orange Drop cap. (Just sounds a little better in both Drive Channels).
18) Replace C33, C35, & C36, the three 22uf power supply filter caps with 40-47uf, 500V caps (Original caps are cheap, and I’ve seen them leak).
19) Clip R103 at either end, and lift it up, and leave it so that it doesn’t touch anything. (Reverb mod:  Makes reverb much warmer and fuller sounding).
20) Check R78 & R79. 470 ohm 16V power supply resistors. (Replace if necessary). Re-mount the resistors up, off the PC board a little to allow for some air flow underneath.
21) Replace Volume pot (R6, 250K) with 1M ohm. Replace Master (R26, 100K) pot with the 250K pot removed from the Volume control.  (Better volume adjustment for Clean & Drive channels).
22) Add Volume & Drive pot treble bypass Caps (Silver Mica). Volume pot=220pf. Drive pot=50pf.
23) Upgrade 6L6 bias 470 ohm resistors to 2W or 5W. (R61 & R62).
24) (Optional) May want to add 3/8 A pico fuses to 6L6 bias trace on tube PC board. Tube Pin#4. This will keep a runaway bias tube failure from frying the 470 ohm resistors on the tube PC board. So, you end up replacing the fuse, instead of a fried resistor, which also fry’s the PC board.
25) Add Snubber circuit to tube PC board. (http://www.guitarplayer.com/article/smooth-your-sonic-ride/5505 )
     a) (Qty=2 of each: [1.5K, 5W]; [8.2M, 1W]; [.01uf, 600V], Orange Drop caps).
26) Be sure to vacuum all the junk out of the bottom of the cassis after all of your mods & rework. You’ll need to get way back in there, under the tube socket PC board.
27) Reinstall and mount the PC boards back into position.
28) Check all of the Flex cable connections on the PC board. All of the flexing from removing and remounting the PC boards can stress the little solder pads on the PC boards. Gently wiggle each flex cable lead on the tube PC board to make sure the solder pad is not just hanging in mid air, broken loose from the PC board. Fix if needed.
29) Redress Power wires harness.
30) Hot Glue large capacitor(s) C31 (and C32, if added) to circuit board (and each other). Also, any additional components you want to stabilize.

PARTS LIST

Description                                                      Qty          Description                                               Qty
100uf Cap (Replace C31. Add C32)             1 or 2     220pf Cap (Vol treble bypass)                         1
.022uf, Org Drp 400v Cap (C2, C6, C10 & C18) 4          22uf, 100V Cap (C8)                                      1
82pf, 1Kv Ceramic Disc (C3)                          1          250pf Cap, 500V (C7)             (Silver Mica)   1
.1uf, Org Drp 400v Cap (C5)                          1          22uf, 500V Cap           (C33, C35, & C36)     3
.0022uf, 400V (C23)                                       1          68K ohm, ½ W (R12)                                     1
50pf Cap (Drive treble bypass)                        1          470 ohm, 2W or 5W    (R61 & R62)              2
100K ohm, 1W (Carb Comp, R4, 11, 16, 22) 4         1M ohm Volume pot   (R6)                              1
470 ohm, 5W  (R78 & R79, if needed)           2          V2 = JJ - 12DW7                                            1


Snubber Ciruit :
Description                                                      Qty      Description                                                      Qty
.1uf, 400V (Orange Drop)                               2          1.5K ohm, 5W                                                 2
8.2M ohm, 1W                                                2

My Tubes:

I am currently using the following tubes, and I’m happy with the tone & the overall performance of the amp for gigging.  By using a 12DW7 in v2, the Drive/More Drive channels are definitely more pleasing and usable over the stock amp. That tube helps tame some of the horrible gain increase when switching from the Clean channel to More Drive, also.

v1 = GT 12AX7          v2 = JJ  12DW7            v3 = Mullard  12AX7A             v4 & 5 = JJ  6L6

INFO About Tubes:

1) Keep the 12AX7’s in V1& V3, and use a 12AT7 in V2. Considering V1 will shape the tone and give some gain, V2 will help tame the drive channel some (very nice), and give more clean, and V3 drives the phase inverter to the output tubes.

2) V1 is going to shape the tone the most. V2 is less important for tone shaping but will affect it some. It can help with more clean with a lower gain tube here, and half is used only for the drive channel. V3 (phase inverter) has little or no affect on tone, but can add to the clean using a lower gain tube there also.

3) V2 - middle small tube - install a good quality 12DW7 - this tube is a 12AX7 on one side and a 12AU7 on the other side. The 12AU7 side is the side of the tube that handles the Drive and More Drive sections. 12AU7 has less gain and will tame the over the top buzzy sound and make it creamy smooth.
********************************
Some HRD III Mods for Tone  (from -steveneddy off the web)


I also bought a HRD III in 2011. Nice amp with most of the mods already taken care of for this stock version.       But I still felt the Drive and More Drive sections were lacking. Too buzzy. Here are some changes you can make to all year models of this amp to wake it up.
First - I tell every tube amp owner to simply try some different tubes. My choices for THIS amp and for the HR Deville are:


V1 - looking at the back of the amp this will be on your right - one of the little tubes - install a Mullard ECC83 in this position. This mainly handles your clean channel and will make the tone better and well defined.

V2 - middle small tube - install a good quality 12DW7 - this tube is a 12AX7 on one side and a 12AU7 on the other side. The 12AU7 side is the side of the tube that handles the Drive and More Drive sections. 12AU7 has less gain and will tame the over the top buzzy sound and make it creamy smooth.

V3 - the left little tube if looking at the rear of the amp. this is called the Phase Inverter. It sends the signal to the power tubes. You want this tube to send a smooth and powerful signal to the power tubes. Install a 12ax7LPS in this slot. Your power tubes will be happy.

My choices for power tubes in the HRD III are:

* Sovtek 5881WXT - creamy smooth and a very nice break up when the amp reaches about 8 on either the clean or dirty channels. With these tubes and high volumes you can use the clean channel only and use the volume on the guitar to get varying degrees of distortion and overdrive, from clean to nasty and dirty.

* Tungsol 6L6-G - very sweet - very loud - added dynamics at high volumes. Much larger than 6L6's, so get the spring keepers that hold the tube down into the sockets because these are much taller and the bases will not work well with the stock bear clamp keeper. Clean, kinda, up to 8, then all Hell breaks loose! One of my favs. This tube sounds almost like the Sovtek 6L6WXT+ - but this tube is much warmer and dynamic.

* Gold Lion KT66 - the golden tubes of clean goodness! These tubes are AWESOME in a HRD III! These tubes will turn your box into a different amp altogether. The tonal range is so huge with these tubes - the crystal Fender highs mixed with your new preamp tubes make this amp sing! And if you have added the preamp tubes mantioned above with these tubes you will get the dirty sounds of Rock-n-Roll, baby! Some people may feel that an extra 6.3v, 6ma transformer needs to be added to the HRD III because the KT66 tube does draw more amperage than a 6L6 tube.

** Power tube changes REQUIRE a bias adjust be performed with EACH power tube change. If you cannot perform this tack, take your amp to a well qualified technician. **

-steveneddy ******************************************************************************************************************

Thursday, January 24, 2013

1/24/13: More Speaker Stuff & 6L6 Tube Protector


1-24-13: 
     More Speaker Stuff: You'll note in the picture on my first post that my amp has this big 5" circle of colored sticky-back foam right across the middle of the speaker area. I forgot to mention that this is to counteract the "beam" effect of the Celestion Vintage 30 speaker. When I was playing a gig last year, another guitarist I know came by, and after helping check our overall band sound for us, told me this during our next break. He said that when he was off to either side of the stage, my guitar sounded fine, but when he walked across the front of the stage, as he passed my amp, it had a particular "ice pick" beaming effect, directly in front of my amp. Once he got a few feet off to either side, it was fine. He said "You must be using a "Vintage 30". I said yes, and he said "Yeah, they're beamy like that". So, when I looked into the "Beam Blocker" things you can buy, I didn't want to pull my speaker back out of the cabinet to install one. I did some reading, and found that Stevie Ray Vaughan used to put duct tape on his speaker cabinets with Vintage 30's, in the shape of an "X" over the center cone area. I wanted to do something just a little more "Classier" than that, so I came up with the sticky-back foam sheet stuff, in a 5" circle. I experimented with 3" & 4" circles, but couldn't decide if all of the "beamyness" was gone yet. I decided on a 5" circle. I knew for certain with the 5" circle, I'd gotten rid of all of the "beamyness". The initial problem was the sticky-back stuff didn't really have the staying power necessary to keep it in place. I used some 3/4" wide x 1/16" thick foam double-stick tape. I cut about 4 - 3" pieces, and used some scissors to cut slits (most of the way across) about every 1/2" apart. Then I took the piece of tape, and bent it around the outer 5" circle of foam sheet, sort of like fanning out the piece of tape at all of the slits. I removed the other tape backing material when all of the tape pieces were in place. Then I centered the foam sheet circle over the speaker cone, and gently pressed it into place, going around the outer edge of the circle. I probably stuck one 1" square piece right in the middle of the foam, to help hold it in place better.
     It has stayed in place well, and that same friend has heard us play at other gigs since that first time, and he said my guitar rig sounds great anywhere in the room where we're playing. Also, I have our band name on the front. A shameless plug: www.DeltaFusionBand.com . We play local clubs in the Loveland & Ft. Collins, CO area, as well as the northern Denver area.


6L6 Tube Protector: One thing I liked on the later Fender HRD amps was the 6L6 Tube Protector cage that was now included on the back cover of the amp. The reason I like this feature is because when gigging, I always us an external speaker cabinet. Reaching under the back cover with a heavy metal ¼” plug, I've banged that plug up against the side of the 6L6 power tube. I've never broken one (yet), but I've come close a couple of times when in a hurry, and I’m packin’ up after a gig, and I try to pull that plug out quickly (but carefully), and I hear it hit the tube.
     I made a protector cage out of ½” hardware grid wire as shown below. The dimensions are 4 1/2" W x 4" H x 2 " D. There is an extra 1/2" tab at the top of the mounting side, to help pinch the cage between the chassis edge and the back cover. I attached the cage to the back cover using some gray thin foam double-stick tape, which has worked our well. Since the back cover spends most of its life screwed to the back of the amp, the cage isn't going to fall or slip out of place.


Wednesday, January 23, 2013

Fender Hot Rod Deluxe and Deluxe III Basics


1-23-13-The Fender HRD Basic Mods

In my previous post, I stated that I'd give you the "Basic" mods I've done, that don't include any circuitry modifications.
1) Change the Speaker: A lot of the amp's "Tone" is a result of the speaker. So, you can change the overall tone by changing the speaker. You can get books on preferred 12" guitar speakers for various amps. My personal preference is the Celestion Vintage 30, a 60 Watt, 8 ohm, 12” speaker. My playing style is geared towards Classic Rock, and I've found I like this speaker best. As with many Mods or changes, subjective personal preference will rule. You may have to do some web searching & reading to find the speaker you think is right for you, and you’re playing style. I know other guys that prefer the Celestion G12T-75 speaker.
NOTE: Changing the speaker requires removing the amplifier chassis from the cabinet. Not for the faint of heart. You have to loosen the six screws holding the chassis in place about 1/4", and then insert the spreader tool. I created a tool that spreads the chassis apart about 1/8", to help the chassis lift out without tearing up the grounding foil around the inside of the cabinet. Once the cabinet is spread with the tool, carefully remove the six screws, starting with the lowest on the sides, and holding onto the chassis carefully so that it doesn't drop into the cabinet on the speaker. The speaker magnets can attract that chassis, so hold on tight, and keep it as far away from the speaker as possible as you lift it out of the cabinet. It will be awkward because of the uneven weight of the transformers mounted on the chassis.

2) Change the speaker Cable: Most all amps and speaker cabinets come prewired with 18 gauge wire. This is great for a table lamp, but if you want to get ALL of the low frequency transferred from the amplifiers output to the speaker itself, you want to use 16, 14, or even 12 gauge cable. I bought a box of crimp on 12 gauge spade connectors, and a spool of 12 gauge, oxygen-free cable, and I make new speaker cables for almost any amp, or speaker cabinet I buy. I also have heavy-duty ¼” jacks that I use on the amplifier end of the cable. In my case, I made the cable long enough, so that if I ever want to use just the speaker in my Fender HRD, I can unplug it from the amp in the back of the cabinet, extend the cable to another amp beside, on top, or below my cabinet. (~3-4 feet).

3) Different Tubes: You can change your tone with different tubes. I like the JJ/Tesla 6L6 power tubes (V4 & V5), biased to ~67mA. (65 – 70MA).
-V1 is the first preamp tube, and will have the most effect on tone.
-V2, middle small tube. I installed a good JJ 12DW7 - this tube is a 12AX7 on one side and a 12AU7 on the other side. The 12AU7 side is the side of the tube that handles the Drive/More Drive sections. The Drive/More Drive channels are definitely more pleasing and usable over the stock amp. That tube helps tame some of the horrible gain increase when switching from the Clean channel to Drive/More Drive, also.
-V3 is the Phase Inverter (PI), to the 6L6 output tubes.

My Tubes:
I am currently using the following tubes, and I’m happy with the tone & the overall performance of the amp for gigging. I hand-picked each of the three small tubes, and this was the combination that worked best for me:

-V1 = Groove Tube 12AX7; -V2 = JJ  12DW7; -V3 = Mullard  12AX7A; -V4 & V5 = JJ  6L6.

4) Redress Wire Harness: You’ll also notice in the pic below, that I redressed the wire harness from the power transformer and the output transformer. This is something pretty standard that all of the custom mod shops do when you send your amp in for custom mod upgrades.

Wire Harness as Shipped from Factory

Monday, January 21, 2013

Welcome: Creation & First Blog

Hi All,     This is my first post and experiment with blogs. This is my favorite MIM Fender HRD Frankenstein test bed, and I DO gig with this guy!


 There are some basic mods that I started with after purchasing the amp new. I'll state the basic mods in my next post.